
TypeScript 2 enables you to develop solid web applications using Express on Node.js
I previously wrote an article on getting started with TypeScript (1.x) with Express and Node.js. This post is very similar, but will take advantage of the new features of TypeScript 2.
Ok, let’s get started.
Source Code
You can download the source code and follow along or fork the repository on GitHub:
Getting Started
To get started we will be using the node package manager (npm) to install the dependencies for our application. Npm is installed along with Node.js. If you have not installed Node.js you can do so via homebrew.
Install Homebrew and update it:
</code>$ /usr/bin/ruby -e "$(curl -fsSL https://raw.githubusercontent.com/Homebrew/install/master/install)"
$ brew update
$ brew doctor</pre>

Then, install node using the `brew install` command:

```bash
$ brew install node
Create Project
Next, let’s create a new project using the npm init command.
I am going to name the project heros in honor of Angular. :)
$ mkdir heroes
$ cd heros
$ npm init
After answering the prompts you will have a new package.json file in your project folder.
Let’s add some custom scripts as well.
First, add the dev script.
This will use the nodemon module to watch for any changes to the source files of the express web application.
If a file changes, then we will restart the server.
Next, add the grunt script.
This simply invokes the grunt task runner.
We will install this later in this tutorial.
Finally, add the start script.
This will use node to execute a bin/www file.
If you are using Linux or a Mac your package.json file should look like:
{
  "name": "heros",
  "description": "The tour of heros",
  "version": "1.0.0",
  "private": true,
  "author": "Brian Love",
  "scripts": {
    "dev": "NODE_ENV=development nodemon ./bin/www",
    "grunt": "grunt",
    "start": "node ./bin/www"
  }
}
If you are using Windows your package.json file should look like:
{
  "name": "heros",
  "description": "The tour of heros",
  "version": "1.0.0",
  "private": true,
  "author": "Brian Love",
  "scripts": {
    "dev": "SET NODE_ENV=development && nodemon ./bin/www",
    "grunt": "grunt",
    "start": "node ./bin/www"
  }
}
Note the minor change to the dev script for Windows users.
Install Express
The next step is to install the Express dependency.
I am including the --save flag to my npm install command so that the dependency is saved in the package.json file.
$ npm install express --save
$ npm install @types/express --save-dev
Note that this also generates a new node_modules folder in your project. If you are using Git then should add this folder to your .gitignore file.
Start script
Next we need to create our start script.
If you recall, we specified a start property within the scripts configuration in the package.json file.
I set the value of this to: “node ./bin/www”.
So, let’s create an empty file at: bin/www
$ mkdir bin
$ cd bin
$ touch www
Here is the full contents of the www file:
#!/usr/bin/env node
'use strict';

//module dependencies
var server = require('../dist/server');
var debug = require('debug')('express:server');
var http = require('http');

//create http server
var httpPort = normalizePort(process.env.PORT || 8080);
var app = server.Server.bootstrap().app;
app.set('port', httpPort);
var httpServer = http.createServer(app);

//listen on provided ports
httpServer.listen(httpPort);

//add error handler
httpServer.on('error', onError);

//start listening on port
httpServer.on('listening', onListening);

/**
 * Normalize a port into a number, string, or false.
 */
function normalizePort(val) {
  var port = parseInt(val, 10);

  if (isNaN(port)) {
    // named pipe
    return val;
  }

  if (port >= 0) {
    // port number
    return port;
  }

  return false;
}

/**
 * Event listener for HTTP server "error" event.
 */
function onError(error) {
  if (error.syscall !== 'listen') {
    throw error;
  }

  var bind = typeof port === 'string' ? 'Pipe ' + port : 'Port ' + port;

  // handle specific listen errors with friendly messages
  switch (error.code) {
    case 'EACCES':
      console.error(bind + ' requires elevated privileges');
      process.exit(1);
      break;
    case 'EADDRINUSE':
      console.error(bind + ' is already in use');
      process.exit(1);
      break;
    default:
      throw error;
  }
}

/**
 * Event listener for HTTP server "listening" event.
 */
function onListening() {
  var addr = httpServer.address();
  var bind = typeof addr === 'string' ? 'pipe ' + addr : 'port ' + addr.port;
  debug('Listening on ' + bind);
}
This is a bit long. So let me break this down and explain each section.
Lines 1-7
#!/usr/bin/env node
'use strict';

//module dependencies
var server = require('../dist/server');
var debug = require('debug')('express:server');
var http = require('http');- First we have the node shebang to execute this script. If you are using Windows, just rename this file to www.js and node will execute this based on the file extension (I think so anyways).
- Then we are enabling strict mode via the
"use strict"command. - And then I am requiring some dependencies. First, I will have a module (file) at: dist/server.js. We have not created this yet, so don’t worry. Then we require the express and http modules.
Lines 10-14
//create http server
var httpPort = normalizePort(process.env.PORT || 8080);
var app = server.Server.bootstrap().app;
app.set('port', httpPort);
var httpServer = http.createServer(app);- First I determine the port that we will bind the http server to, and listen on. This will first check for a
PORTenviroment variable and then default to 8080. - I am also using a
normalizePort()function that was provided by the Google Cloud Platform team. I take no credit for this, or for theonError()andonListening()code. I borrowed these from their example application. - Next, I am going to
bootstrap()my application. This will make more sense after we have created our Server class. - I then set the port for our HTTP server.
- And finally we create the http server, passing in our express
app.
Lines 17-23
//listen on provided ports
httpServer.listen(httpPort);

//add error handler
httpServer.on('error', onError);

//start listening on port
httpServer.on('listening', onListening);
In this section I am specifying the port that our http server will listen on and then I attach some event handlers.
I am listening to the error and listening events.
The error event will fire when an error occurs during the creation of the application.
And the listening event will fire when the http server has started and is listening on the specified port.
Install TypeScript and Grunt
Next, install TypeScript using the npm install command:
$ npm install typescript --save-devI am going to be using the Grunt task runner to compile the TypeScript source code. Use npm to install grunt:
$ npm install grunt --save-devNow that we have grunt installed, let’s install some task runners:
$ npm install grunt-contrib-copy --save-dev
$ npm install grunt-ts --save-dev
$ npm install grunt-contrib-watch --save-dev
The grunt-contrib-copy task runner will copy over files in the ./public and ./views directories into the ./dist directory.
We will use grunt-ts task to compile the TypeScript source.
And we will use grunt-contrib-watch to watch for any changes to our TypeScript source files.
When a file is updated (or saved) then I want to re-compile my application.
Combined with our dev script that we created in the package.json file earlier we will be able to easily make changes to the TypeScript source and then view the changes instantly in the browser.
Create gruntfile.js
The next step is to configure Grunt to compile our TypeScript source code. First, create the gruntfile.js file in the application root (heros in this example).
$ touch gruntfile.jsOpen up the gruntfile.js file in your favorite editor. FWIW, I am using Visual Studio Code.
module.exports = function (grunt) {
  'use strict';

  grunt.initConfig({
    copy: {
      build: {
        files: [
          {
            expand: true,
            cwd: './public',
            src: ['**'],
            dest: './dist/public',
          },
          {
            expand: true,
            cwd: './views',
            src: ['**'],
            dest: './dist/views',
          },
        ],
      },
    },
    ts: {
      app: {
        files: [
          {
            src: ['src/**/*.ts', '!src/.baseDir.ts'],
            dest: './dist',
          },
        ],
        options: {
          module: 'commonjs',
          target: 'es6',
          sourceMap: false,
          rootDir: 'src',
        },
      },
    },
    watch: {
      ts: {
        files: ['src/**/*.ts'],
        tasks: ['ts'],
      },
      views: {
        files: ['views/**/*.pug'],
        tasks: ['copy'],
      },
    },
  });

  grunt.loadNpmTasks('grunt-contrib-copy');
  grunt.loadNpmTasks('grunt-contrib-watch');
  grunt.loadNpmTasks('grunt-ts');

  grunt.registerTask('default', ['copy', 'ts']);
};
Here is a quick explanation of gruntfile.js:
- Using the
exportsobject we are exporting a function that will be invoked by the grunt task runner. This is pretty standard. It has a single argument namedgrunt. - Following best practices I am enabling strict mode.
- Then we invoke the
grunt.initConfig()method and pass in our configuration object. - Inside our configuration object we specify each task.
- The first task is
copy. This task will copy over the files in our ./public and ./views directories. - The next task is
ts. This task will compile the TypeScript source code to JavaScript that can be executed by Node.js. The compiled JavaScript code will be output to ./dist directory. - The third task is
watch. This task will watch for any changes to our TypeScript source files (*.ts) as well as our view template files (*.pug).
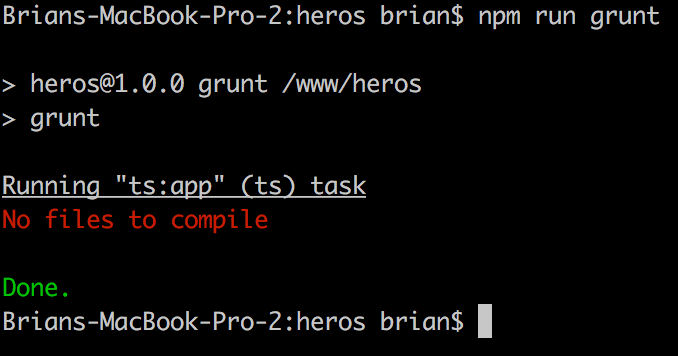
If everything works you should be able to execute the grunt command.
$ npm run gruntAnd you should see something like this:
Install Middleware
Before we can create our server.ts module we need to install some more dependencies. I am using the following middleware in this example Express application:
You can read more about each of these using the links above. Let’s go ahead and get these installed via npm:
$ npm install body-parser --save
$ npm install cookie-parser --save
$ npm install morgan --save
$ npm install errorhandler --save
$ npm install method-override --save
We also need to install the TypeScript declaration files for these modules. Previous to TypeScript 2 you had to use an open-source project called Typings. This is no longer the case as TypeScript 2 has greatly improved support for third-party module declarations (or header files).
Let’s install the TypeScript declaration files using the @types/ repository on npmjs.org:
$ npm install @types/cookie-parser --save-dev
$ npm install @types/morgan --save-dev
$ npm install @types/errorhandler --save-dev
$ npm install @types/method-override --save-dev
Create Server Class
To get started create a src directory for your TypeScript code and then create a new server.ts file.
$ mkdir src
$ cd src
$ touch server.ts
We are almost ready to fire up our new HTTP server using Express on Node.js.
Before we do that we need to create our Server class.
This is the class that will configure our express web application, the REST API, and the routes.
Here is the beginning of the server.ts file that defines our Server class:
import * as bodyParser from "body-parser";
import * as cookieParser from "cookie-parser";
import * as express from "express";
import * as logger from "morgan";
import * as path from "path";
import errorHandler = require("errorhandler");
import methodOverride = require("method-override");

/**
 * The server.
 *
 * @class Server
 */
export class Server {

  public app: express.Application;

  /**
   * Bootstrap the application.
   *
   * @class Server
   * @method bootstrap
   * @static
   * @return {ng.auto.IInjectorService} Returns the newly created injector for this app.
   */
  public static bootstrap(): Server {
    return new Server();
  }

  /**
   * Constructor.
   *
   * @class Server
   * @constructor
   */
  constructor() {
    //create expressjs application
    this.app = express();

    //configure application
    this.config();

    //add routes
    this.routes();

    //add api
    this.api();
  }

  /**
   * Create REST API routes
   *
   * @class Server
   * @method api
   */
  public api() {
    //empty for now
  }

  /**
   * Configure application
   *
   * @class Server
   * @method config
   */
  public config() {
    //empty for now
  }

  /**
   * Create router
   *
   * @class Server
   * @method api
   */
  public routes() {
    //empty for now
  }
}
Let’s dig into the Server class, which is inside of the server.ts module (file).
Importing
import * as bodyParser from "body-parser";
import * as cookieParser from "cookie-parser";
import * as express from "express";
import * as logger from "morgan";
import * as path from "path";
import errorHandler = require("errorhandler");
import methodOverride = require("method-override");- First we import the middleware and necessary modules that we previously installed.
- The body-parser middleware will parse JSON payload data into the
req.bodyobject that will be available in our express application. - The cookie-parser middleware is similar to the body-parser in that it parses the user’s cookie data and makes this available in the
req.cookiesobject. - We then import the express module. This is the express framework.
- I am using the morgan HTTP logger middleware. This should only be used during development.
- I then import the path module. I will use this to set the path directories for public and views directories in the
config()method. - The errorhandler middleware will handle errors during development. Again, this should not be used in production. Rather, you will want to log your errors and then show the user a error indication.
- Finally, I am using the method-override middleware. You may not need this, but this is required when using “PUT” and “DELETE” HTTP verbs in your REST API configuration.
The Server class
/**
 * The server.
 *
 * @class Server
 */
export class Server {

  public app: express.Application;

  /**
   * Bootstrap the application.
   *
   * @class Server
   * @method bootstrap
   * @static
   * @return {ng.auto.IInjectorService} Returns the newly created injector for this app.
   */
  public static bootstrap(): Server {
    return new Server();
  }
}
Next we create a new class called Server.
Our class has a single publicly available variable named app.
Note that our app is of type express.Application.
Inside the Server class I have a static method named bootstrap().
This is invoked in our www startup script.
It simply creates a new instance of the Server class and returns it.
The constructor Function
/**
  * Constructor.
  *
  * @class Server
  * @constructor
  */
constructor() {
  //create expressjs application
  this.app = express();

  //configure application
  this.config();

  //add routes
  this.routes();

  //add api
  this.api();
}
In the constructor() function I set the value of the app property by creating a new express application.
I am then calling some methods that are defined in the Server class to configure my application and to create my app’s REST API and HTTP routes.
For now these are left empty.
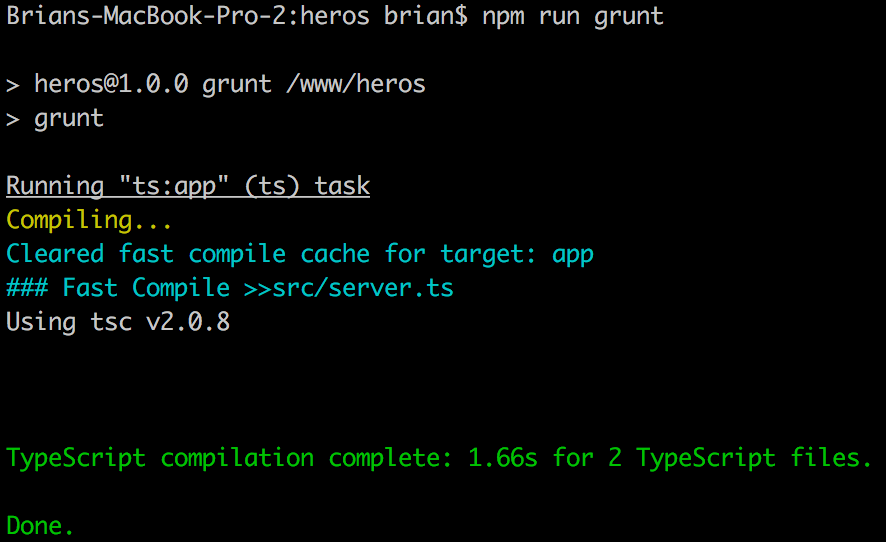
You might want to test things out at this point. While we don’t have our HTTP server configured yet, we should be able to compile our TypeScript using grunt:
$ npm run gruntYou should see an indication that the compilation completed successfully:
Configure Server
The next step is to implement the config() method in our Server class:
/**
  * Configure application
  *
  * @class Server
  * @method config
  */
public config() {
  //add static paths
  this.app.use(express.static(path.join(__dirname, "public")));

  //configure pug
  this.app.set("views", path.join(__dirname, "views"));
  this.app.set("view engine", "pug");

  //use logger middlware
  this.app.use(logger("dev"));

  //use json form parser middlware
  this.app.use(bodyParser.json());

  //use query string parser middlware
  this.app.use(bodyParser.urlencoded({
    extended: true
  }));

  //use cookie parser middleware
  this.app.use(cookieParser("SECRET_GOES_HERE"));

  //use override middlware
  this.app.use(methodOverride());

  //catch 404 and forward to error handler
  this.app.use(function(err: any, req: express.Request, res: express.Response, next: express.NextFunction) {
      err.status = 404;
      next(err);
  });

  //error handling
  this.app.use(errorHandler());
}
Some notes on the config() method:
- First, I set up a static path at /public. Any files located in the ./public folder will be publicly accessible (duh).
- Next, I configure the pug template engine. We’ll install this in a minute. All of our pug template files will be located in the ./views directory.
- Then we add the morgan logger middleware.
- Then we add the body-parser middleware to parse JSON as well as the query string.
- Then we add the cookie-parser middleware.
- Then we add the method-override middleware.
- Finally, we add some code to catch 404 errors as well as any application exceptions.
As I indicated above we are using the pug template engine. Before we can use this, however, we need to install it via npm:
$ npm install pug --saveWe should also create the public and views directories:
$ mkdir public
$ mkdir views
Here is what our directory structure should look like:
.
├── bin
│ └── www
├── dist
│ └── server.js
├── gruntfile.js
├── package.json
├── public
├── src
│ ├── npm-debug.log
│ └── server.ts
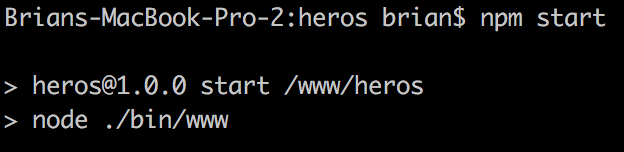
└── viewsNow that our server is configured we should be able to compile our TypeScript source code and start the node HTTP server:
$ npm run grunt
$ npm start
You should then see that node is running:
Go ahead and load up your brand new Express + Node.js server at http://localhost:8080 and you should see:
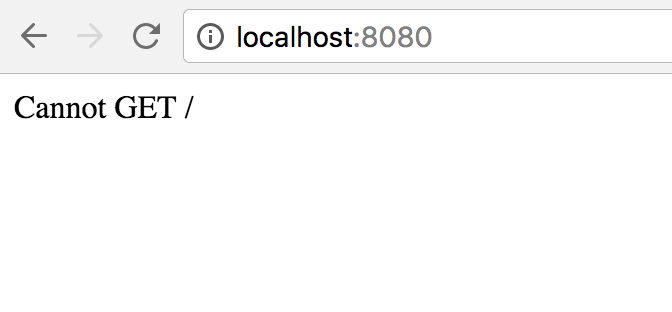
This is because we have not defined any routes yet. Let’s go ahead and do that next.
Create BaseRoute Class
Now that our server is configured and running we are ready to start building our web application’s routes. But, you might be asking yourself what a route is. Well, according to the Express documentation:
Routing refers to determining how an application responds to a client request to a particular endpoint, which is a URI (or path) and a specific HTTP request method (GET, POST, and so on).
First, let’s create a ./src/routes directory with two new files: route.ts and index.ts.
$ cd ./src
$ mkdir routes
$ touch route.ts
$ touch index.ts
The route.ts module will export the BaseRoute class.
All of the route classes will extend the BaseRoute.
Let’s take a look.
import { NextFunction, Request, Response } from "express";

/**
 * Constructor
 *
 * @class BaseRoute
 */
export class BaseRoute {

  protected title: string;

  private scripts: string[];

  /**
   * Constructor
   *
   * @class BaseRoute
   * @constructor
   */
  constructor() {
    //initialize variables
    this.title = "Tour of Heros";
    this.scripts = [];
  }

  /**
   * Add a JS external file to the request.
   *
   * @class BaseRoute
   * @method addScript
   * @param src {string} The src to the external JS file.
   * @return {BaseRoute} Self for chaining
   */
  public addScript(src: string): BaseRoute {
    this.scripts.push(src);
    return this;
  }

  /**
   * Render a page.
   *
   * @class BaseRoute
   * @method render
   * @param req {Request} The request object.
   * @param res {Response} The response object.
   * @param view {String} The view to render.
   * @param options {Object} Additional options to append to the view's local scope.
   * @return void
   */
  public render(req: Request, res: Response, view: string, options?: Object) {
    //add constants
    res.locals.BASE_URL = "/";

    //add scripts
    res.locals.scripts = this.scripts;

    //add title
    res.locals.title = this.title;

    //render view
    res.render(view, options);
  }
}
My BaseRoute is currently pretty thin.
But, this will serve as a way to implement authentication in my application later, and possibly many other features that all routes need to have.
I have a title string variable that will hold the title for the route.
As an example the BaseRoute currently stores an array of scripts that are necessary for a specific route.
You might also want to define scripts in your BaseRoute that all routes will require.
This is just an example of a feature that you may want to implement in the BaseRoute that will be available to all of your routes.
Further, the BaseRoute class has a render() method.
This will be invoked in each of the route methods in our extending classes.
This provides us a single method to render a view with common local template variables defined.
In this example, I am setting BASE_URL, scripts and title into each view.
Create IndexRoute Class
A route definition is defined via:
app.METHOD(PATH, HANDLER);Where METHOD is the appropriate HTTP verb, such as get or post.
The method should be in lowercase.
The PATH is the requested URI path.
And, the HANDLER is a function that is executed when the route is matched.
The index.ts module will export the IndexRoute class. Let’s take a look at that.
import { NextFunction, Request, Response, Router } from "express";
import { BaseRoute } from "./route";


/**
 * / route
 *
 * @class User
 */
export class IndexRoute extends BaseRoute {

  /**
   * Create the routes.
   *
   * @class IndexRoute
   * @method create
   * @static
   */
  public static create(router: Router) {
    //log
    console.log("[IndexRoute::create] Creating index route.");

    //add home page route
    router.get("/", (req: Request, res: Response, next: NextFunction) => {
      new IndexRoute().index(req, res, next);
    });
  }

  /**
   * Constructor
   *
   * @class IndexRoute
   * @constructor
   */
  constructor() {
    super();
  }

  /**
   * The home page route.
   *
   * @class IndexRoute
   * @method index
   * @param req {Request} The express Request object.
   * @param res {Response} The express Response object.
   * @next {NextFunction} Execute the next method.
   */
  public index(req: Request, res: Response, next: NextFunction) {
    //set custom title
    this.title = "Home | Tour of Heros";

    //set options
    let options: Object = {
      "message": "Welcome to the Tour of Heros"
    };

    //render template
    this.render(req, res, "index", options);
  }
}
Let’s review the IndexRoute class:
- First, we import the
NextFunction,Request,ResponseandRouterclasses from the express module. - I also import the
BaseRouteclass from the routes module. - The
create()static method creates all of the routes that will be defined in the class. In this example, I am only defining a single route. But, you will likely have several routes defined for section of your application. For example, aUsersRouteclass might have routes for /users/signin, /users/signup, etc. - The
constructor()function simply invokes theBaseRoute’s constructor function. - The
index()function will render our template. Before we render the template we set a custom title as well as define an object namedoptionswhich contains properties and values that will be available in our template. In this example I am setting a local template variable namedmessagethat contains a simple string. I’ll output this in the index.pug template.
Define routes
Now that we have created the shell of our first route we need to define this in our Server class.
However, before we define the route, let’s first import our IndexRoute class in our server.ts module via:
import { IndexRoute } from './routes/index';Then, let’s implement the routes() method in the server.ts module:
/**
  * Create router.
  *
  * @class Server
  * @method config
  * @return void
  */
private routes() {
  let router: express.Router;
  router = express.Router();

  //IndexRoute
  IndexRoute.create(router);

  //use router middleware
  this.app.use(router);
}
In the routes() method we create the express.Router() instance.
We then invoke the static IndexRoute.create() method and pass in the router instance.
Finally, we add the router middleware to our application.
Create Template
Now that we have the routes created and defined we need to create the necessary template. In this example I am going to create a single index.pug file in the views directory.
$ cd ./views
$ touch index.pug
Here is what my example index.pug file looks like:
html
  head
    title= title
  body
    h1= message
Serve it up!
We made it. We have built a solid foundation for developing an application using Express from TypeScript source code. The next step is to compile and start the server.
$ npm run grunt
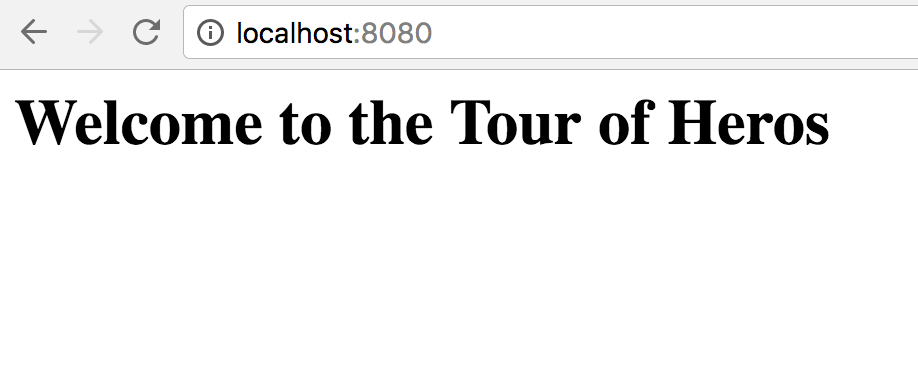
$ npm startNow fire up your browser and go to http://localhost:8080. If everything is working you should see the following message in your browser:
Install nodemon
If you want to start our node server that will watch for any changes to the source code (while in development) then I suggest you use nodemon.
$ npm install nodemon --save-devWe can then run our custom dev script that we defined in package.json to start our application use nodemon:
$ npm run devSource Code
Add MongoDB + Mocha + Chai
If you loved this post then check out TypeScript 2 + Express + Mongoose + Mocha + Chai.
Now, I know that sounds like a lot.
I’ll walk you through getting everything installed and configured so that your Express web application can persist data to a MongoDB collection. Then we’ll use the Mocha testing framework with Chai assertions to make sure it works.