Amazon’s Relational Database Service (RDS) enables developers to launch database instances in the cloud that are managed by Amazon.
What this means is that developers can focus more on development and less on minor upgrades to the database, replication, fault tolerance and backups. This all sounds great, but there is one minor issue: no file system access. While this is generally not an issue, it does become an issue if you are attempting to create/restore a SQL Server backup (.bak) file.
RDS <> .bak
Unfortunately, not having access to the file system on our RDS instances means that we cannot create or import a .bak file.
So, what are we left to do? Well, there is a pretty lengthy process outlined in the documentation as the solution for importing or exporting data for your SQL Server RDS instance:
- Take a snapshot of your source RDS instance.
- Disable automatic backups on your source RDS instance.
- Prepare your target database by disabling all foreign key constraints and triggers.
- Import logins into the target database.
- Create the schema DDL using the Generate and Publish Scripts Wizard in SSMS.
- Executing the SQL commands on your target database to create your schema.
- Use either the bulk copy command (bcp) or the Import/Export Wizard in SSMS to migrate your data from the source database to your target database.
- Clean up the target database by re-enabling the foreign key constraints and triggers.
- Re-enable the automatic backups on the source RDS instance.
Going through this process is time consuming and prone to errors. Thankfully, after going through this process several times, I found a better solution that is not documented in the AWS documentation.
SQL Azure Migration Wizard
The SQL Azure Migration Wizard makes the process of migrating databases (or any table/view/stored procedure) in, out, or between RDS instances a much easier and faster process. Although we are not using the SQL Azure service from Microsoft, this tool works very well with SQL Server running on an RDS instance.
- Download the SQL Azure Migration Wizard on codeplex.
- Extract and execute the SQLAzureMW.exe file.
- Select Database under the Analyze/Migrate option, select the SQL Server version of your source database and click Next.
- Enter your source database server connection string and credentials, and click Connect.
- Select the source database and click Next.
- Select the database objects (or all) to script, click Next, Next and Yes.
- Then, enter your target database connection string and credentials, and click Connect.
- Either select an existing database as the target, or create a new database, and click Next.
- Let it run.
Now, although the steps above are the same number (coincidentally) of steps, trust me, the SQL Azure Migration Wizard will save you a lot of time (likely, hours). To walk you through the process, I put together a video demonstrating the use of the SQL Azure Migration Wizard to copy data in and out of an RDS instance using SQL Server.
Connection Attempt Failed when using bcp
This may not apply to you, but I want to note this for those that might be running into the same issue.
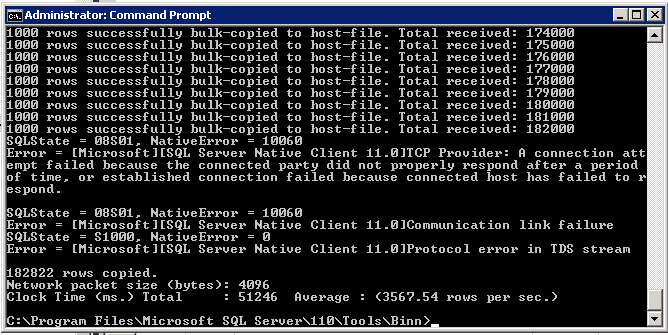
When attempting to import/export a large table you may run into a TCP connection error I ran into this issue when running SQL Server Management Studio on an Windows EC2 instance and attempting to use either the bulk copy command (bcp) or the import/export wizard. The connection error that I received stated:
SQLState = 08S01, NativeError = 10060 Error = [Microsoft][sql server native client 11.0]TCP Provider: A connection attempt failed because the connected party did not properly respond after a period of time, or established connection failed because connected host has failed to respond. Error =[Microsoft][sql server native client 11.0]Communication link failure Error =[Microsoft][sql server native client 11.0]Protocol error in TDS stream
migrating-databases-in-amazon-rds-error.png

The solution to this is to disable the TCP offloading on the Citrix PV Ethernet Adapter (NIC). To do this in your Windows EC2 instance you will need to:
- Start > Control Panel > Network and Sharing Center > Change Adapter Settings.
- Right-click on the Citrix virtual network adapter and choose Properties.
- Click on the Configure button for the network adapter, and choose the Advanced tab.
- For each property in the list on the left, set the value to Disabled using the select list on the right.
This solved all of my TCP communication link failures when exporting large tables out of my RDS instance.
