The Express web application framework for Node.js is arguable one of the most popular solutions for creating web apps built on the async Node.js engine.
Getting started with Express is easy. In this tutorial I will walk through setting up Express + Node.js using the node package manager (npm). We’ll wire up a server in JavaScript and then build the app using TypeScript.
TypeScript 2 Update
If you are ready for TypeScript 2 then head over the TypeScript 2 update on this article: TypeScript 2 + Node.js + Express
Why TypeScript?
I believe that TypeScript has been embraced as the choice language for building next generation web application using ECMAScript 6 (ES6) with strong typing. Strong typing doesn’t necessarily improve the JavaScript that your Node.js server will execute, or the JavaScript that your browser might execute. However, it provides the developer more insight into public and 3rd party APIs as well as reducing the bugs (and development cycle to check for bugs) in the software we are developing.
Let’s Get Started
Let’s spin up our first Express + Node.js server using npm + Javascript.
- Download and Install Node.js
- Create a package.json file
- Install Express
$ mkdir myapp
$ cd myapp
$ npm init
After answering the prompts, a package.json file is created in your myapp directory.
Next, let’s add some information to our package.json file:
- Specify the node engine
- Create a start script
{
  "name": "myapp",
  "description": "Just for fun",
  "version": "1.0.0",
  "private": true,
  "author": "Brian Love",
  "engines": {
    "node": "~5.6"
  },
  "scripts": {
    "start": "node ./bin/www"
  }
}
Note the engines and scripts properties have been added to the configuration.
The engines property is not necessary, but is helpful if you are deploying to the Google Cloud platform.
The scripts property is a map of scripts that can be executed using npm.
In this example, we have created a script named start that executes node and provides the initial JavaScript file to execute.
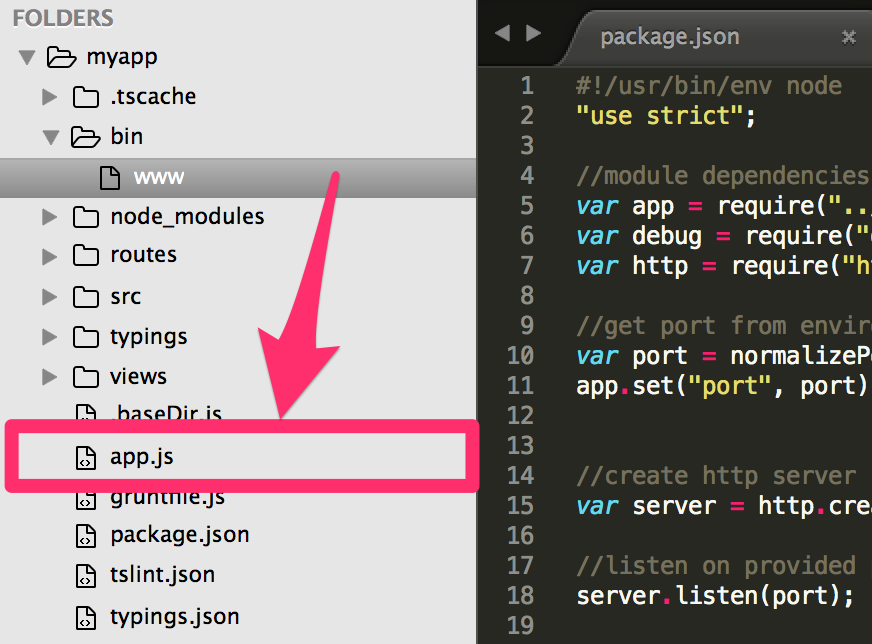
In this case I have created a directory in my application called bin, with a file named www (notice there is no extension).
This www file is the JavaScript file that is executed by node.js, that will in turn start our Express web application.
Installing Express
Next, let’s install the express package into our application. This is super easy using npm:
$ npm install express --saveAfter running this command you should see a node_modules folder in your application’s root directory (where you are executing this command). This folder contains all of the node modules that express depends on, as well as the express module. As we build our Express + Node.js application this folder will contain all of the 3rd-party modules that we are using.
If you are using Git make sure you add the node_modules folder to your .gitignore file prior to committing.
Setting Up Express + Node.js
To get started with express we will create a bin/www file that the npm start command will execute.
$ mkdir bin
$ cd bin
$ touch www
From there, open Sublime Text or your favorite editor. We’ll just be writing vanilla JavaScript to get our Express + Node.js web application up and running. Then, once we start coding our app we’ll switch over to TypeScript.
Why not use TS for the server startup? Well, I figure that once I write this code, I’m done. Sounds optimistic, I know. But, in theory I’ll spend the rest of my time working on my app.
The most basic form of the server JavaScript code is below.
#!/usr/bin/env node
'use strict';

//module dependencies.
var app = require('../app');
var debug = require('debug')('express:server');
var http = require('http');

//get port from environment and store in Express.
var port = normalizePort(process.env.PORT || 8080);
app.set('port', port);

//create http server
var server = http.createServer(app);

//listen on provided ports
server.listen(port);

//add error handler
server.on('error', onError);

//start listening on port
server.on('listening', onListening);
The first thing that we are doing is requiring the module “../app”. This refers to a file named app.js that will live in our root folder (under myapp in this example). The app.js file will be created from our TypeScript source file. So, for now, don’t worry about creating this. Just keep in mind that we will be creating an app.js file that bootstrap’s our application.
Also, you might have noticed that I am calling a function called normalizePort(), which accepts the port value that is retrieved from the environment variable named “PORT”.
If this is undefined (a falsey), then the port defaults to 8080.
You might not need to worry about this now - but it will be helpful when you launch your app into to the wild.
The normalizePort() method was provided as part of the Google Cloud developer documentation, so I take no credit for it.
/**
 * Normalize a port into a number, string, or false.
 */
function normalizePort(val) {
  var port = parseInt(val, 10);

  if (isNaN(port)) {
    // named pipe
    return val;
  }

  if (port >= 0) {
    // port number
    return port;
  }

  return false;
}
Further, I also have an onError() function that is called when an uncaught exception is thrown.
This, again, was provided by the Google Cloud platform sample from Github.
/**
 * Event listener for HTTP server "error" event.
 */
function onError(error) {
  if (error.syscall !== 'listen') {
    throw error;
  }

  var bind = typeof port === 'string' ? 'Pipe ' + port : 'Port ' + port;

  // handle specific listen errors with friendly messages
  switch (error.code) {
    case 'EACCES':
      console.error(bind + ' requires elevated privileges');
      process.exit(1);
      break;
    case 'EADDRINUSE':
      console.error(bind + ' is already in use');
      process.exit(1);
      break;
    default:
      throw error;
  }
}
There is also a callback function called onListening that is executed once the server has successfully started.
**
 * Event listener for HTTP server "listening" event.
 */
function onListening() {
  var addr = server.address();
  var bind = typeof addr === "string"
    ? "pipe " + addr
    : "port " + addr.port;
  debug("Listening on " + bind);
}
Ok, we have the busy work done. W e have express installed as a node module and we have our start script created. Now, let’s start writing our app using TypeScript.
Install TypeScript Compiler & Linter
Ok, let’s get our TypeScript environment configured for our application. The first thing we need to do is install the typescript compiler. We’ll do this using npm.
$ npm install typescript --saveTo compile our TypeScript we will be using the Grunt task runner. So, let’s get it installed, again using npm. Then we’ll create the gruntfile.js file.
$ npm install grunt --save
$ npm install grunt-cli --save
$ npm install grunt-ts --save
$ npm install grunt-tslint --save
$ npm install grunt-contrib-watch --save
$ npm install tslint --save
$ touch gruntfile.js
Open up the gruntfile.js that is located in the root of your application (next to package.json). If you’re unfamiliar with Grunt, check out their website to become familiar with it. I’m not going to dive into Grunt as that is beyond the scope of this tutorial.
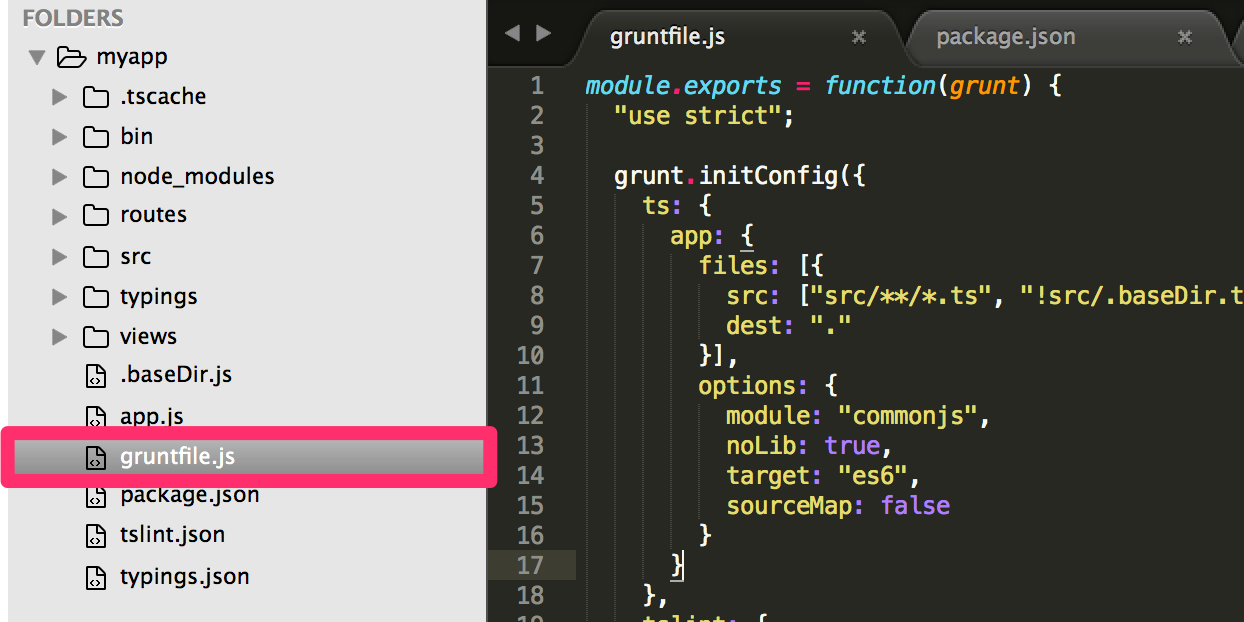
Let’s add a task for compiling our TypeScript code. I’ll also be adding a task to lint my TS code, as well as a watch task for automatically compiling and linting my TS after changes are saved. Here is the full gruntfile.js contents to get us started.
module.exports = function (grunt) {
  'use strict';

  grunt.initConfig({
    ts: {
      app: {
        files: [
          {
            src: ['src/**/*.ts', '!src/.baseDir.ts', '!src/_all.d.ts'],
            dest: '.',
          },
        ],
        options: {
          module: 'commonjs',
          noLib: true,
          target: 'es6',
          sourceMap: false,
        },
      },
    },
    tslint: {
      options: {
        configuration: 'tslint.json',
      },
      files: {
        src: ['src/**/*.ts'],
      },
    },
    watch: {
      ts: {
        files: ['js/src/**/*.ts', 'src/**/*.ts'],
        tasks: ['ts', 'tslint'],
      },
    },
  });

  grunt.loadNpmTasks('grunt-contrib-watch');
  grunt.loadNpmTasks('grunt-ts');
  grunt.loadNpmTasks('grunt-tslint');

  grunt.registerTask('default', ['ts', 'tslint']);
};
The typescript compiler will look for all files with the .ts file extension located in a src/ directory that we will create. We are also ignoring some common files that might appear in our src folder, such as .baseDir and _all.d.ts. The _all.d.ts file references all of the TypeScript declaration files in my project.
We can manually execute this using the node_modules/.bin/tsc binary executable, or we can create a script in our package.json file to do this for us. So, let’s simply add the following script to package.json. Your package.json file should now look like this:
{
  "name": "myapp",
  "version": "1.0.0",
  "description": "",
  "scripts": {
    "grunt": "grunt",
    "start": "node ./bin/www"
  },
  ...
}
Ok - we’re almost there. Next, we need to tell tslint what our lint rules are. Here is what my tslint.json file looks like.
{
  "rules": {
    "class-name": true,
    "curly": true,
    "eofline": false,
    "forin": true,
    "indent": false,
    "label-position": true,
    "label-undefined": true,
    "max-line-length": [true, 150],
    "no-arg": true,
    "no-bitwise": true,
    "no-console": false,
    "no-construct": true,
    "no-constructor-vars": false,
    "no-debugger": true,
    "no-duplicate-key": true,
    "no-duplicate-variable": true,
    "no-empty": true,
    "no-eval": true,
    "no-string-literal": true,
    "no-switch-case-fall-through": true,
    "no-trailing-whitespace": true,
    "no-unused-expression": true,
    "no-unused-variable": false,
    "no-unreachable": true,
    "no-use-before-declare": true,
    "no-var-requires": false,
    "one-line": [
      true,
      "check-open-brace",
      "check-catch",
      "check-else",
      "check-whitespace"
    ],
    "quotemark": [true, "double"],
    "semicolon": true,
    "triple-equals": [true, "allow-null-check"],
    "typedef": [true,
      "callSignature",
      "indexSignature",
      "parameter",
      "propertySignature",
      "variableDeclarator",
      "memberVariableDeclarator"],
    "use-strict": false,
    "variable-name": [
        true,
        "allow-leading-underscore"
    ],
    "whitespace": [
      true,
      "check-branch",
      "check-decl",
      "check-operator",
      "check-separator",
      "check-type"
    ]
  }
}
If everything works you should be able to execute the grunt command.
$ npm run grunt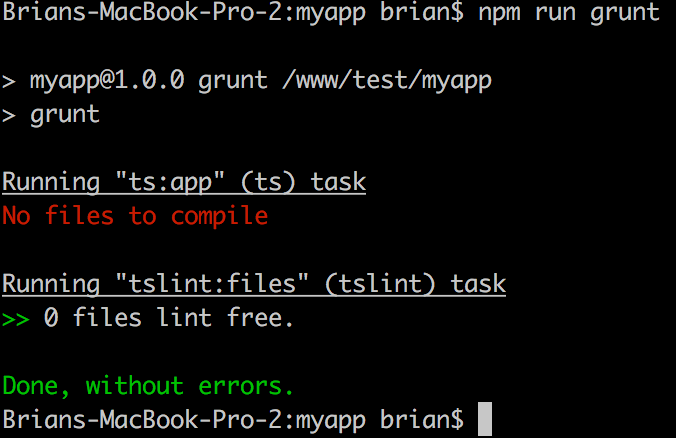
TypeScript Express Web Application
If you made it this far we’re finally ready to start coding up our application using TypeScript + Express + Node.js. In other words, now we can get started with the fun stuff!
To get started, create a src directory for your TypeScript code.
$ mkdir src
$ cd src
$ touch app.ts
Let’s get started with our application. The first thing we want to do is create a Server class.
"use strict";

import * as bodyParser from "body-parser";
import * as express from "express";
import * as path from "path";

/**
 * The server.
 *
 * @class Server
 */
class Server {

  public app: express.Application;

  /**
   * Bootstrap the application.
   *
   * @class Server
   * @method bootstrap
   * @static
   * @return {ng.auto.IInjectorService} Returns the newly created injector for this app.
   */
  public static bootstrap(): Server {
    return new Server();
  }

  /**
   * Constructor.
   *
   * @class Server
   * @constructor
   */
  constructor() {
    //create expressjs application
    this.app = express();

    //configure application
    this.config();
  }
}
Let’s quickly walk through the TypeScript above.
- First, I am using strict mode for JavaScript.
- Next, we are importing the necessary modules for the application. We are using the
body-parsermodule, theexpressengine, and the built-in node.jspathmodule. - Then I create the
Serverclass. - The
Serverclass has a property named app that is of type express.Application. We’ll dig more into this type declaration in a bit. Just hang tight. - The
Serverclass has a static method named bootstrap that will create a new instance of ourServerclass. - The
Serverclass also has a constructor method that creates and configures our application.
There are a couple of issues before we move ahead:
- We have not installed the body-parser module. We will need to do that using npm.
- The TypeScript compiler doesn’t know anything about the built-in objects, like
ArrayandBoolean. - The TypeScript compiler doesn’t know the type definition for express (remember, the type declaration for the app property was set to express.Application).
So, let’s install the body-parser module.
$ npm install body-parser --saveNow, let’s create a new _all.d.ts file that will include references to all of the type definitions for our application.
$ touch _all.d.tsOpen the _all.d.ts file and paste this new line at the top of the file
/// <reference path="../node_modules/typescript/lib/lib.es6.d.ts" />Then, modify your app.ts file so that you are referencing the _all.d.ts file
/// <reference path="_all.d.ts" />The TypeScript compiler now knows about the ES6 interfaces (and objects). We’ll also put more references in the _all.d.ts file, including the reference to our main typings file.
Next we’ll look at using typings for obtaining type definition files for common modules that we will be using.
This will allow us to take full advantage of TypeScript’s strong typing when working with open source projects, like Express or Angular. Otherwise we would have to declare all of the appropriate interfaces and typing declarations.
Install Typings
Typings uses the DefinitelyTyped library for retrieving and storing TypeScript definition files for node modules and open source frameworks and libraries (like express or Angular). In case you have been using TypeScript you may have used the tsd command line utility for installing TypeScript definition files from DefinitelyTyped. However, at the time of this writing, tsd has been deprecated in favor of the new typings project.
$ npm install typings --saveOnce we have typings installed we can use the command-line interface for searching and installing TypeScript definition files. It is important to note that I will be executing the typings CLI from the application’s root directory.
$ node_modules/.bin/typings install body-parser --ambient --save
$ node_modules/.bin/typings install express --ambient --save
$ node_modules/.bin/typings install node --ambient --save
$ node_modules/.bin/typings install serve-static --ambient --save
$ node_modules/.bin/typings install express-serve-static-core --ambient --save
$ node_modules/.bin/typings install mime --ambient --save
The next step is to reference the typings/main.d.ts file that is generated from typings. The main.d.ts file is similar to our _all.d.ts file in that it contains references to all of the TypeScript definition files that are installed/managed by typings. So, open up the _all.d.ts file and add this line of code below the existing line we just added.
/// <reference path="../typings/main.d.ts" />Now that we have typings installed and we are referencing the main.d.ts definition file that Typings generates we are ready to build our TypeScript + Express + Node.js application.
$ npm run grunt
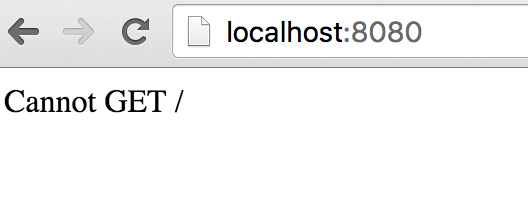
$ npm startIf we visit http://localhost:8080 in our browser we should we an error indicating that there is not a GET route specified for the root.
Define Routes
The final step is to define the routes for your web application. I like to configure my routes in separate classes in a Routes module. Here is what my src/routes/index.ts file looks like.
/// <reference path="../_all.d.ts" />
"use strict";

import * as express from "express";

module Route {

  export class Index {

    public index(req: express.Request, res: express.Response, next: express.NextFunction) {
      //render page
      res.render("index");
    }
  }
}

export = Route;
My Index.index() route simply renders the index page.
To wire this up, we need to first require the routes/index.ts module in our application app.ts file.
import * as indexRoute from './routes/index';Then, I’ll create a new private method named routes(), which is called from the constructor function.
/**
 * Constructor.
 *
 * @class Server
 * @constructor
 */
constructor() {
  //create expressjs application
  this.app = express();

  //configure application
  this.config();

  //configure routes
  this.routes();
}
My routes() method simply wires up the GET request for the web root: /.
/**
 * Configure routes
 *
 * @class Server
 * @method routes
 * @return void
 */
private routes() {
  //get router
  let router: express.Router;
  router = express.Router();

  //create routes
  var index: indexRoute.Index = new indexRoute.Index();

  //home page
  router.get("/", index.index.bind(index.index));

  //use router middleware
  this.app.use(router);
}
In the routes() method I first get access to the Router() in express, then using the module that I imported previously, I instantiate a new instance of the Index class.
My Index class has a method named index (I know, a little confusing).
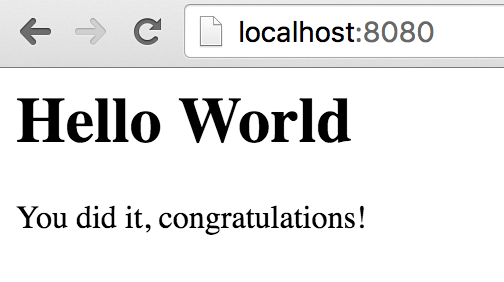
Hello World
Well, we made it. It’s finally time to output the famous “Hello World”. When we configured the application I chose to use the jade template engine. You can choose to use another template engine if you prefer. So, let’s install jade via npm.
$ npm install jade --saveThen, let’s create a views folder and an index.jade file.
$ mkdir views
$ cd views
$ touch index.jade
Open up index.jade in your favorite editor and add the following.
h1 Hello World!
p You did it, congratulations!
Don’t forget to recompile your TypeScript code into JavaScript, or use the grunt watch command:
$ npm run grunt watchOnce your TS is compiled, restart your server.
$ npm startNow, load http://localhost:8080 in your browser and you should see the following: