I am continuing a series of articles focused on migrating a website to support HTTPS Everywhere. The goal of HTTPS Everywhere is to have the entire web be secure using the latest security and best practices. However, we also have to be aware of the possible performance implications with using HTTPS.
The first step we took to improve performance over HTTPS was to enable the keep-alive connection header. The next step we want to take now is to enable the strict transport security (HSTS) header. The HSTS header instructs your user’s browser to only connect to the current domain, and optionally all subdomains, using a secure connection.
In this article I will cover:
- Why use HSTS?
- Implementation in Apache and IIS
- Testing to make sure it works
Before we get started, however, let me quickly point out that HSTS header is widely accepted by major browsers except for Internet Explorer up to 11, though Microsoft has announced that IE 12 will support HSTS.
Why?
The answer to this question is: performance.
As we just learned, the HSTS setting instructs the browser to only connect via HTTTPS until an expiration time.
For most purposes, you should set the max-age expiration as high as you feel comfortable.
By using HSTS we are avoiding any unnecessary redirects to the secure HTTPS address of our website, and any other assets or resources delivered by our server.
For example, if you look at the screen shot below you will see the redirect from HTTP to HTTPS. This redirect is a result of our server responding to the original HTTP request with a 301 permanent redirect to the same resource using HTTPS.
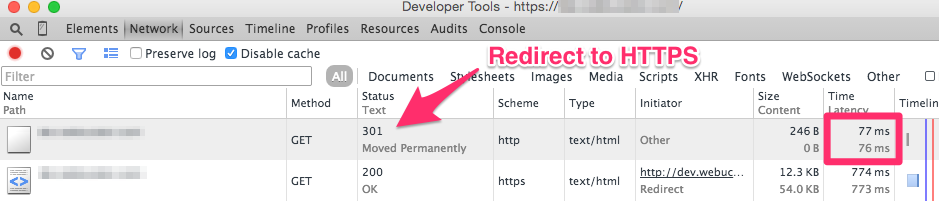
This is good. Our insecure website is redirecting to our new secure website. But, this also does cost us a little bit of time during the page load. In this instance it was 77ms. This doesn’t seem like much time, but we can easily remove this.
We can set this header using either our server side application code or our web server. In this article I will show how you easily add this header to your Apache or IIS web server.
Apache
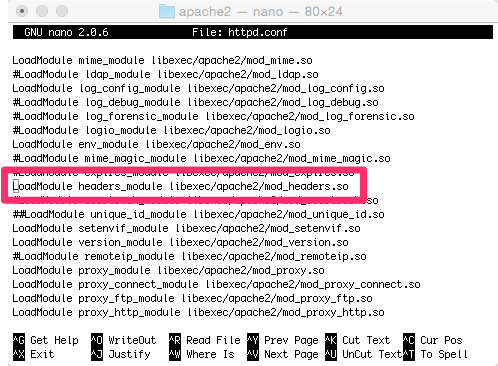
If you have been following along with the series on HTTPS Everywhere then you already enabled the mod_headers extension in Apache to enable the keep-alive connection header.
However, if you are just reading this article, you might want to first check that the mod_heeaders extension is enabled.
$ cd /etc/apache2/
$ sudo nano httpd.conf
Uncomment the line that loads the mod_headers.so extension.
We can then add the following code to the .htaccess file in our webroot.
<IfModule mod_headers.c>
    Header set Strict-Transport-Security: max-age=10886400
</IfModule>
Last, we want to test our configuration changes and restart the web server.
$ sudo apachectl -t
$ sudo apachectl restart
IIS
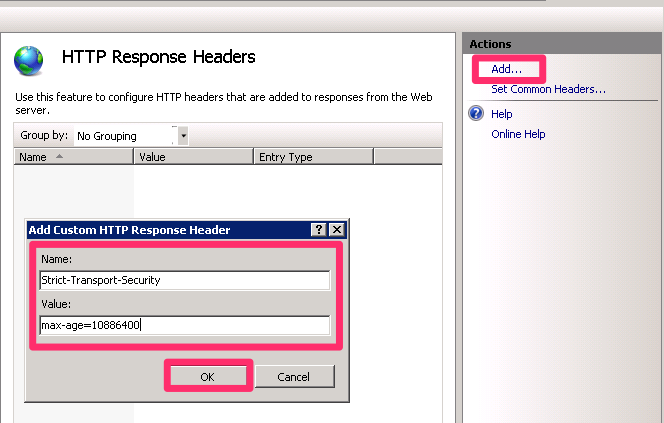
We will simply add a new header for our site, though, you can also set the response header at the server or folder level if necessary.
- Open IIS Manager and select the site to add the keep-alive connection header.
- Double-click on the HTTP Response Headers
- Click Add…
- Set the name to: Strict-Transport-Security
- Set the value to: **max-age=10886400 **and click OK
You can also add the following code to your web.config file to enable HSTS for your IIS site.
<system.webServer>
    <httpProtocol>
        <customHeaders>
            <add name="Strict-Transport-Security" value="max-age=31536000"/>
        </customHeaders>
    </httpProtocol>
</system.webServer>
Testing HSTS
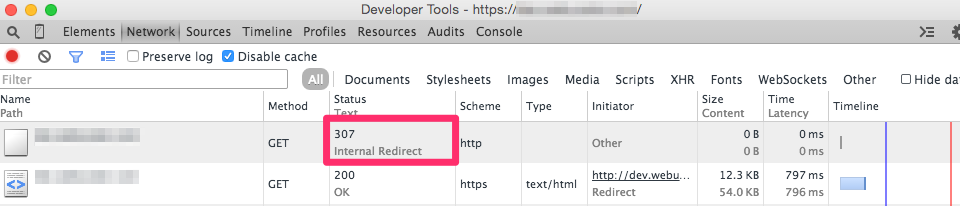
To test the result of our new header we simply reload our website using a non-secure URL. Upon inspecting the Network tab within the Developer Console in Chrome we can see that the browser is issuing a 307 internal redirect.
The result is a reduction of the 77ms redirect to HTTP to 0ms.