As part of a series on setting up HTTPS Everywhere I am migrating a website to use HTTPS for all requests. So far we have configured the server with a SSL Certificate to serve our content via HTTPS, as well as doing some configuring of our SSL engine to ensure that we are using the latest security protocols and ciphers.
Now, we are going to fine tune our web server for HTTPS. Tuning your code and server for performance, both on the server and on the client, is important no matter if you are using HTTPS or not. However, as part of our migration to HTTPS we want to ensure that we reduce any performance issues or bottlenecks before they arise. Heck, we want to keep our load time under 1s.
Why?
One justified reason for the claim of HTTPS being slower is that there is an additional handshake that is required to secure the connection between the client and server. As part of our performance optimization we will use the keep alive connection header to keep our HTTP requests open. This will avoid the need to repeatedly close and open a new connection, resulting in the need to perform the additional handshake to setup the encrypted tunnel.
Here is a graphic from Wikipedia showing the different between using multiple connections and a persistent connection.

By default the HTTP connection is closed after each request has completed. Using the keep-alive connection header allows us to keep the connection open between the client and server for multiple requests, thus minimizing the overhead of establishing a secure connection.
This optimization technique can be applied to your HTTP/1.1 web server whether or not you are serving your content via HTTPS. However, this optimization technique is more critical when serving content via HTTPS due to the additional SSL/TLS handshake.
All modern browsers support persistent HTTP connections, so our job is to enable it on the web server. So, let’s take a look at enabling this on both Apache and IIS.
Apache
Open httpd.conf file and add the following code to the file. My file is located at /etc/apache2/httpd.conf
#
# KeepAlive: Whether or not to allow persistent connections (more than
# one request per connection). Set to "Off" to deactivate.
KeepAlive On

# MaxKeepAliveRequests: The maximum number of requests to allow
# during a persistent connection. Set to 0 to allow an unlimited amount.
# We recommend you leave this number high, for maximum performance.
MaxKeepAliveRequests 100

# KeepAliveTimeout: Number of seconds to wait for the next request from the
# same client on the same connection.
KeepAliveTimeout 100
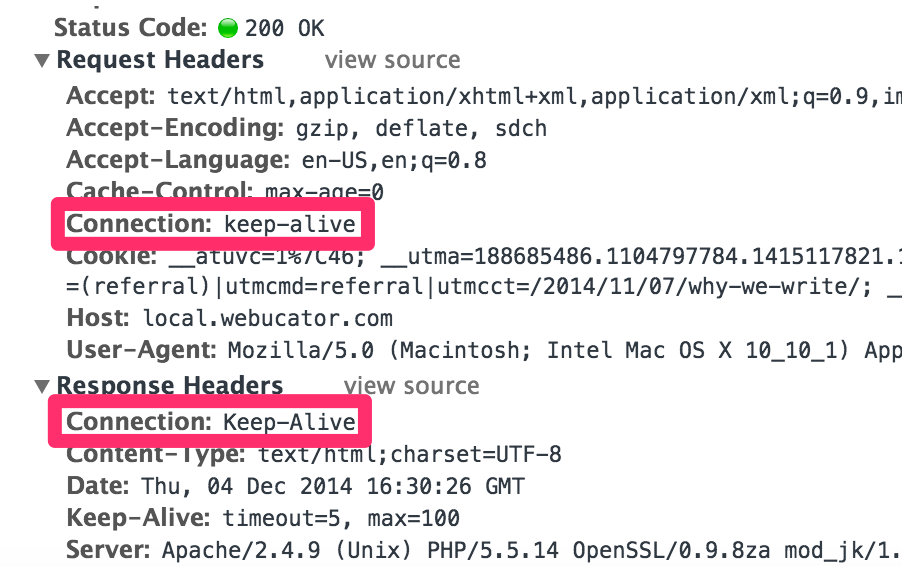
Now restart Apache and check the response headers.
You should see that the server responds with the Connection header set to Keep-Alive.

IIS
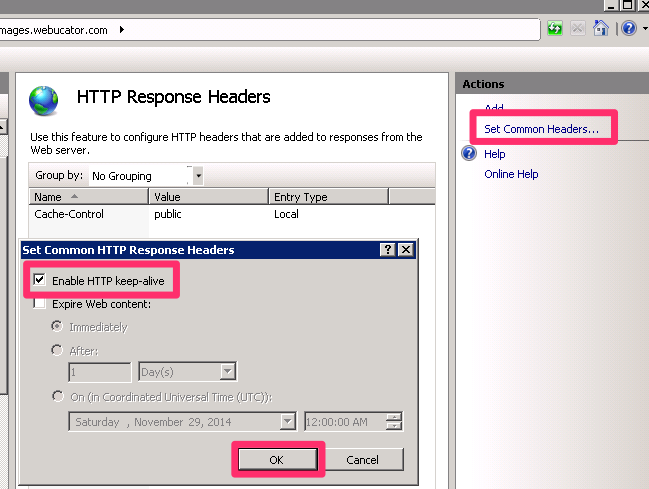
We can configure the keep-alive connection at the server, site or folder level. You can set this using the IIS GUI or via a web.config file. First, let’s look at setting this for a site in IIS.
- Open IIS Manager and select the site to add the keep-alive connection header.
- Double-click on the HTTP Response Headers
- Click Set Common Headers…
- Check the Enable HTTP keep-alive checkbox and click OK

Note that IIS does not send the keep-alive response header as seen in the screen shot above. According to this forum posting on iis.net:
Since IIS are strictly following HTTP/1.1 RFC compliant, please find below RFC document which explains about Connection and Keep-Alive headers,http://tools.ietf.org/html/rfc2068 The Keep-Alive header itself is optional, and is used only if a parameter is being sent. HTTP/1.1 does not define any parameters. HTTP/1.0 used to send these headers to assure persistent connection. However due to some issues, it has been removed and made optional in HTTP/1.1.
