
In this post we’ll be using HTTP with Apache on OS X Yosemite. In a previous post I showed you how to create a self-signed certificate. If you followed along then you created the following files in the /etc/apache2/ssl folder:
- local.example.com.crt
- local.example.com.key
Now, we are going to go through the steps necessary to set up HTTPS on our local Apache web server:
- Load mod_ssl extension
- Include ssl config file
- Modify ssl config file, adding our new virtual host bound to port 443
- Optionally specify new testing domain in our hosts file
- Test and restart Apache
Why?
First, let’s answer a simple question: “Why?” In an effort to support HTTPS Everywhere we are migrating our website to use HTTPS. In later blog posts I will show how we will perform the migration to HTTPS.
The real reason for using HTTPS is to secure the web. The risks to users and privacy are at the highest levels today, and I suspect that the risks will only increase, while our users will increasingly expect the protection of their privacy.
Load mod_ssl
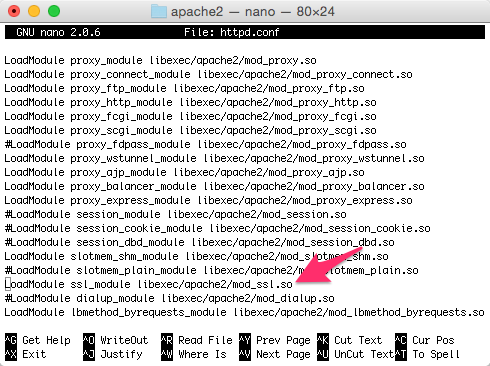
OK, now that we know why we are doing this, let’s dive it. First, simply uncomment the following line in the httpd.conf file. To modify the httpd.conf file we will use nano text editor. I also recommend using Textmate, and then you can just replace “nano” with “mate” in the following commands.
My httpd.conf file is located at: /etc/apache2/httpd.conf
$ cd /etc/apache2/
$ sudo nano httpd.conf
Find the following line and uncomment it. Just in case you are not sure, comments have a leading pound/hash symbol ( # ) — just remove it.
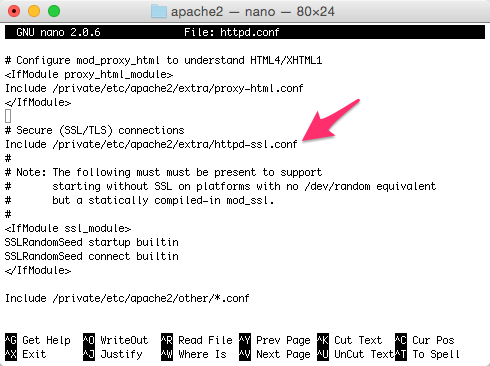
Include httpd-ssl.conf File
While we still have the httpd.conf file open, we also need to uncomment the line that includes the httpd-ssl.conf file.
Add VirtualHost to httpd-ssl.conf
The last step is to configure a new virtual host that is bound to port 443 (HTTPS).
There is already a sample <VirtualHost> record in the httpd-ssl.conf file.
I suggest you first remove it, or comment it all out, so that you can just paste in the necessary code at the bottom of the file.
My httpd-ssl.conf file is located at: /etc/apache2/conf/httpd-ssl.conf
You will need to open the file using nano:
$ cd /etc/apache2/extra
$ sudo nano httpd-ssl.conf
Declare VirtualHost
The first step is to declare a new virtual host using the
<VirtualHost *:443>General Virtual Host Settings
Next, within the <VirtualHost> directive, we will declare some basic host settings:
DocumentRoot: absolute path to the webroot for the siteServerName: the fully qualified domain name (FQDN)ErrorLog: location of the error logCustomLog: location of the access log
Enable SSL
To enable the SSL engine in Apache we simply add set the setting to “on”.
 #SSL Engine Switch
SSLEngine on
Specify certificate and private key
Using the paths as I described at the beginning, we will tell the SSL engine the location of the certificate request file (csr) and the private host key (.key).
`#Server Certificate:
SSLCertificateFile "/private/etc/apache2/ssl/local.example.com.crt"

#Server Private Key:
SSLCertificateKeyFile "/private/etc/apache2/ssl/local.example.com.key"
SSL Engine Options
There are lots of options that you can (and should if you are setting up a production server) configure for the SSL Engine, including the supported ciphers and the ordering of the ciphers used. If you have been following any recent security news, you have probably heard of the POODLE security flaw that uses a SSL 3.0 fallback vulnerability. To prevent any risk on a production server you must configure your server to use the latest version of TLS (1.3 as of this writing), and remove the support for teh older SSL version 2.0 and 3.0 protocols.
Protocols and ciphers — oh my!
If you are confused about all of the protocols, ciphers, prioritization logic, etc. Then I would recommend that you read the Mozilla article on Server Side security and TLS. They offer some best practice configurations for production environments and various web servers; including: IIS, Apache and Nginx.
For our local development server we are not going to worry about the protocols/ciphers and just simply add the following options.
#SSL Engine Options:
<FilesMatch "\.(cgi|shtml|phtml|php)$">
    SSLOptions +StdEnvVars
</FilesMatch>
<Directory "/Library/WebServer/CGI-Executables">
    SSLOptions +StdEnvVars
</Directory>
Complete Virtual Host
Last, we need to close the <VirtualHost> directive.
Our complete virtual host in the httpd-ssl.conf file should look like this:
<VirtualHost *:443>
    #General setup for the virtual host
    DocumentRoot "/www/local.example.com/www"
    ServerName local.example.com
    ErrorLog "/private/var/log/apache2/local.example.com-error_log"
    CustomLog "/private/var/log/apache2/local.example.com-access_log" common

    #SSL Engine Switch:
    SSLEngine on

    #Server Certificate:
    SSLCertificateFile "/private/etc/apache2/ssl/local.example.com.crt"

    #Server Private Key:
    SSLCertificateKeyFile "/private/etc/apache2/ssl/local.example.com.key"

    #SSL Engine Options:
    <FilesMatch "\.(cgi|shtml|phtml|php)$">
        SSLOptions +StdEnvVars
    </FilesMatch>
    <Directory "/Library/WebServer/CGI-Executables">
        SSLOptions +StdEnvVars
    </Directory>
</VirtualHost>
Hosts file
In case this is a new website, you should also modify your hosts file to direct the domain name to your local Apache web server. If you already had the domain configured in your hosts file, then you can skip this step.
The hosts file is located at: /etc/hosts
Note that the file does not have an extension. Let’s open this up in nano.
$ cd /etc
$ sudo nano hosts
Then, add a new line for your website. I am using local.example.com.
127.0.0.1 local.example.com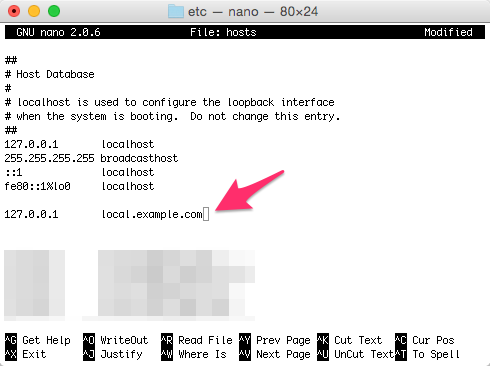
Test Configuration and Restart Apache
The last step is to test our new configuration, and assuming everything is good, restart the Apache web server.
$ sudo apachectl -t
$ sudo apachectl restart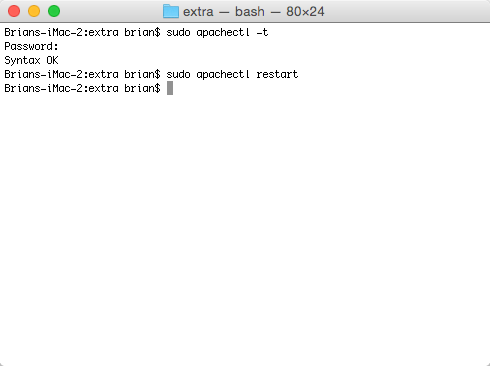
All done. You are now serving your website over HTTPS using Apache.