As part of a series on migrating a website to support HTTPS everywhere I needed to create a self-signed certificate on Mac OS X. It’s pretty easy. Here is what you need to do:
- Create a host key
- Create a certificate request
- Create the SSL certificate
- For apache, create a nopass host key
To get started, we will create a new folder called ssl in our /etc/apache2 folder.
$ cd /private/etc/apache2
$ sudo mkdir ssl
$ cd ssl
Create Host Key
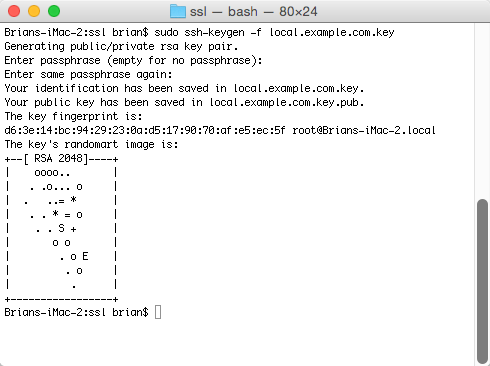
$ sudo ssh-keygen -f local.example.com.keyYou should get a message: Generating public/private rsa key pair., and then you will be asked to provide a passcode for the host key. You can choose anything for the passcode, or leave it blank.
Create Certificate Request
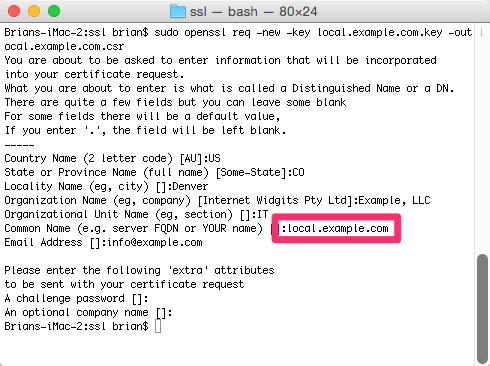
Using the host key you created, create the certificate request file. Note that I am using local.example.com as the file naming convention. I recommend that you use something similar based on your website address.
$ sudo openssl req -new -key local.example.com.key -out local.example.com.csrAfter executing this command, you will be prompted to enter information about the entity/organization/company. As this is a self-signed certificate, this doesn’t really matter. So, enter whatever suits you — except for Common Name (e.g. server FQDN or YOUR name). The FQDN, or fully qualified domain name, must match the website URL. In this example, we would enter local.example.com.
Create SSL Certificate
This next step is not required in a production environment. However, on my local development environment I am going to create a self-signed certificate. This certificate has no authority, and I will get a warning from my browser indicating this. However, there is no need to purchase a SSL certificate for local development. In a production environment you would submit the certificate request (csr) file to the certificate authority, who would then provide you with the SSL certificate.
So, let’s go ahead and create the self-signed certificate. If you followed the steps above, enter the following command to create the SSL certificate using the csr file.
$ sudo openssl x509 -req -days 365 -in local.example.com.csr -signkey local.example.com.key -out local.example.com.crt
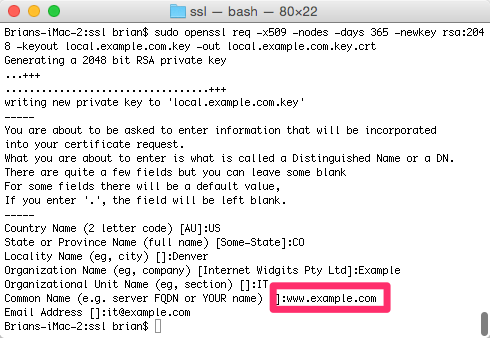
As James commented below, we can also skip the csr step when creating a self-signed certificate. James also provided the single command for this:
$ sudo openssl req -x509 -nodes -days 365 -newkey rsa:2048 -keyout local.example.com.key -out local.example.com.key.crtYou will be prompted to enter information about your organization, as well as the common name, or fully qualified domain name (FQDN). Be sure that this matches the virtual host (or site) that you are setting up.
Create nopass Host Key
In order to configure Apache we need to create a nopass key. If you are not using this SSL certificate for Apache you may not be required to do this last step.
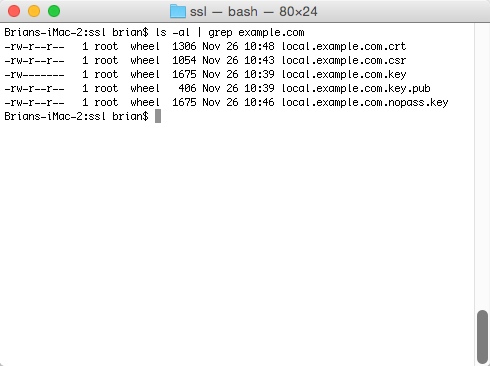
$ sudo openssl rsa -in local.example.com.key -out local.example.com.nopass.keyIf this runs successfully, you should get a simple message: writing RSA key. All set. We should now see several files in our ssl directory that we will use for securing our website.