
In this tutorial we are going to walk through the steps necessary to create a popover view in your iPad application.
I am going to be using Xcode 4.5.2, ARC, and a storyboard for developing the app.
The app is also a universal application that has an iPhone storyboard as well.
The same UITableView that we will be showing in the iPad popover will be displayed in a modal view on the iPhone/iPod touch.
Create Storyboard
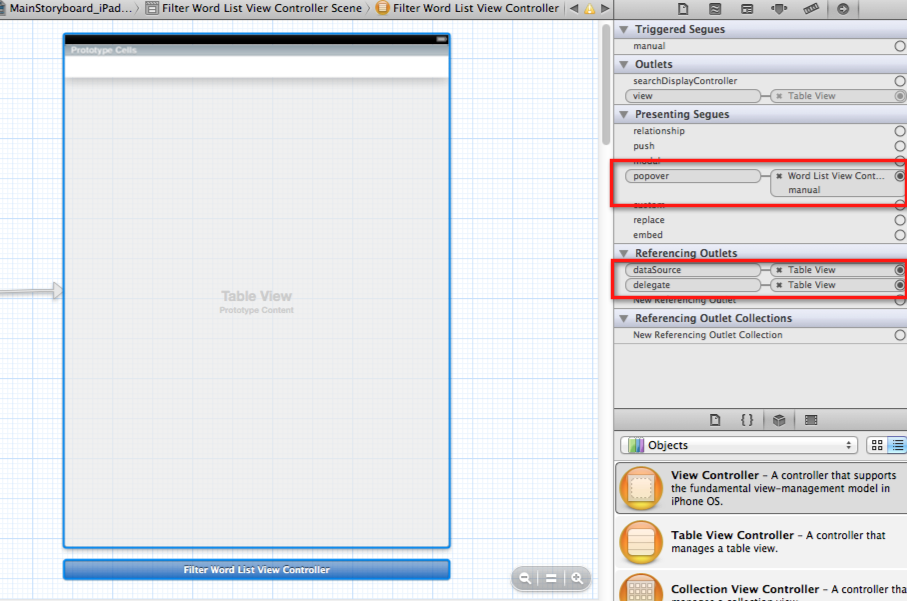
We need to create the storyboard, IBActions and IBOutlets so that we have a UIControl (or button), a new TableView tied to a custom TableViewController class, and a popover (iPad) or modal (iPhone) segue to the new table view.
The first step is to create the UITableViewController in both the iPhone and iPad storyboards.
Just drag out the TableViewController from the object library in Xcode’s interface builder.
Create a new file that extends the UITableViewController class, and also implements the UITableViewDelegate and UITableViewDataSource protocols.
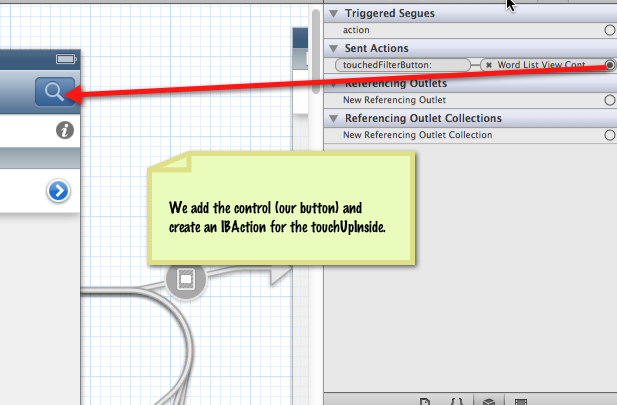
Create the UIControl that is going to be the anchor for the popover view.
I have added a new UIBarButtonItem in my navigation bar that I am going to use to trigger the popover.
Create an IBActions for onTouchUpInside for the button. I’ve called minetouchedFilterButton:.
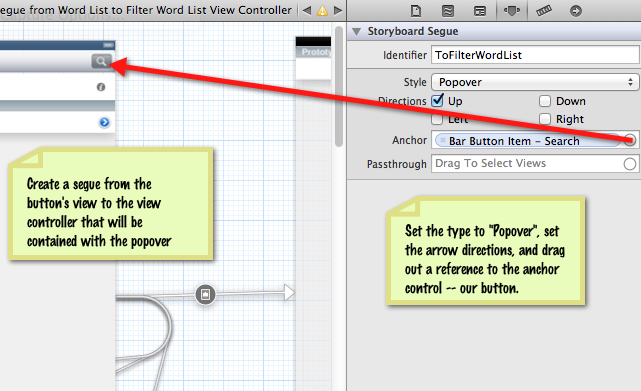
Create a popover (iPad) or modal (iPhone) segue from the button’s view controller to the new table view controller, and give it an identifier — I am using the identifier: “ToFilterTableView”. Set the style of the segue for the iPad storyboard to a “popover”, along with the direction(s) for the anchor arrow, and bind to the anchor element (drag out from the circle in the anchor input in the storyboard properties).
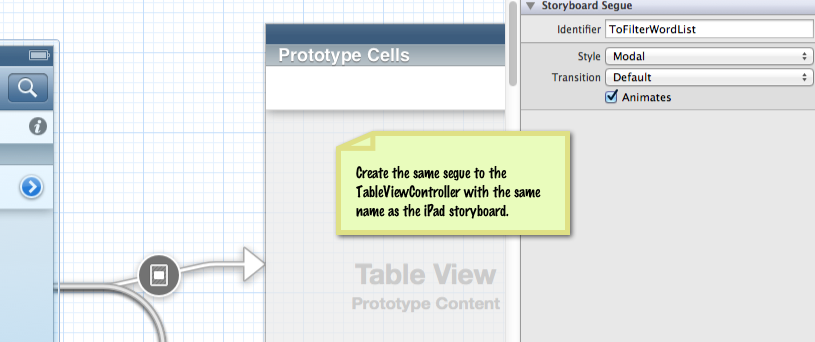
For the iPhone storyboard, we add the same segue, but specify that the style is “modal”. This means that the view will slide up from the bottom over the current view, showing the same table that will be in our iPad popover.
We will use the table in the popover/modal view to set a sorting user option. Choosing a new sorting method in the popover/modal will refresh the content in the table that is being displayed to the user.
ViewController code
When I say “ViewController”, I am referring to the main view controller that is going to show the popover.
For me, this view controller contains the filter UIBarButtonItem that is going to trigger the popover on the iPad, or the modal view on the iPhone.
In our ViewController, we want to implement the IBAction that we bound to the UIBarButtonItem’s sent action.
If you are using a standard UIButton as your anchor point, then you would bind the IBAction to the onTouchUpInside event for the button.
My bar button item is bound to the touchedFilterButton: method.
Here is what my code is for this method looks like.
- (IBAction)touchedFilterButton:(UIBarButtonItem *)sender {
  if (_filterPopoverController == nil){
    [self performSegueWithIdentifier:segueToFilterPopoverView sender:self];
  }else
    [_filterPopoverController dismissPopoverAnimated:YES];
    _filterPopoverController = nil;
  }
}
Here, I am checking a class instance variable named _filterPopoverController is a nil object, and if so, we are going to trigger the segue to show the filter popover.
If the object is not nil, or already exists, then the popover is being show to the user.
In this case, we want to dismiss the popover when the filter button is touched.
This way the filter button can toggle the popover “on” and “off”.
Now, let’s look at the prepareForSegue:sender: method implementation in our view controller.
This is where we will set any information into the segue’s destination controller, and set the size of the popover if we are doing a popover segue on the iPad.
- (void) prepareForSegue:(UIStoryboardSegue *)segue sender:(id)sender {
  if ([segue.identifier isEqualToString:segueToFilterPopoverView]){
    FilterWordListViewController *vc = segue.destinationViewController;
    [vc setFilterDelegate:self];
    if ([segue isKindOfClass:[UIStoryboardPopoverSegue class]]){
      _filterPopoverController = [(UIStoryboardPopoverSegue *)segue popoverController];
      [_filterPopoverController setPopoverContentSize:CGSizeMake(320, 240)];
      [_filterPopoverController setDelegate:self];
    }
  }
}
In my implementation of the prepareForSegue:sender: method I am checking the segue identifier to ensure we are working with the segue to the filter popover view.
If we are, I am getting reference to the destination view controller, which is of type FilterWordListViewController.
Next, I am setting the filterDelegate property to the current object (self).
I am going to be creating a custom delegate protocol so that my ViewController can be notified when the user has chosen a different filter type.
Lastly, I am checking if the segue is a UIStoryboardPopoverSegue.
In our storyboards, we set the segue as a popover for the iPad, and we set the segue as a modal for the iPhone.
Therefore, this code will run when we are triggering the popover segue on the iPad.
If so, we are getting reference to the UIPopoverController instance, and setting the size of the popover using the setPopoverContentSize: method.
I am also setting the delegate property for the UIPopoverController.
This delegate property is reference to an object (again, the current object in the instance, or self) that implements the UIPopoverControllerDelegate protocol.
We will show more of our implementations of this protocol shortly.
Just to clarify further, here is what my header file looks like for the ViewController:
@interface ViewController : UIViewController

@property (weak, nonatomic) IBOutlet UITableView *tableView;
 @property (strong, nonatomic) UIPopoverController *filterPopoverController;

- (IBAction)touchedFilterButton:(UIBarButtonItem *)sender;
 @end
FilterViewController
We are going to be using the delegation pattern to notify the ViewController when our filter selection has been updated.
Our filter selection is simply just a UITableView that has the different filter options, allowing our user to select one.
The currently selected filter is shown in the table using the checkbox accessory type to the row. You can see this in the screen shot at the top of this page.
To get started with our delegation pattern, we are going to define a custom protocol named FilterDelegate.
@protocol FilterDelegate
- (void)filterSelected:(FilterType)filterType;
@end
In the code above, we are declaring our new protocol, which the ViewController will implement.
This protocol states that the adopter must have a filterSelected: method, which is provided with the FilterType chosen.
This protocol definition is in the FilterViewController.h header file.
In here, I also declare a new filterDelegate property to hold reference to the delegate object that will receive the filterSelected: message.
@property (strong, nonatomic) id filterDelegate;Looking back at our prepareForSegue:sender: implementation above, you can see where I am setting the value for this property to the ViewController’s self.
Lastly, my FilterViewController is going to adopt the UITableViewDelegate protocol, which enables us to implement the tableView:didSelectRowAtIndex: method. This is called when the user touches and selects one of the rows in the table (or one of the filter options in my case).
- (void)tableView:(UITableView *)tableView didSelectRowAtIndexPath:(NSIndexPath *)indexPath
{
  //get the FilterType
  _filterType = filterTypes[indexPath.row];

  //save to user defaults
  [[NSUserDefaults standardUserDefaults] setObject:[NSNumber numberWithInt:_filterType] forKey:@"wordListFilterType"];

  //call delegate method
  if (_filterDelegate != nil) {
    [_filterDelegate filterSelected:_filterType];
  }
}
In the code above we are checking if the filterDelegate property (remember, instance variable’s for auto-synthesized properties start with an underscore) if not nil.
If the filterDelegate is set, then we are calling the filterSelected: method on that object.
We know that the object has implemented this method because it is required as part of adopting the FilterDelegate protocol that we defined earlier.
Back to ViewController
Back in the ViewController, let’s look at our implementation of the filterSelected: method.
#pragma mark - FilterDelegate method(s)

- (void)filterSelected:(FilterType)type {
  _filterType = type;
  [self initWords];
  [_tableView reloadData];
  if ([[UIDevice currentDevice] userInterfaceIdiom] == UIUserInterfaceIdiomPad){
    [self touchedFilterButton:nil];
  }else{
    [self.navigationController dismissModalViewControllerAnimated:YES];
  }
}
In the implementation of the filterSelected: method, we are refreshing the table view that is being shown to the user (underneath the popover) based on the newly selected FilterType.
After reloading the table with the new data, I am going to hide the popover by calling the touchedFilterButton:methodagain, which will dismiss the popover and set the reference to the filter popover controller to nil.
My ViewController is also adopting the UIPopoverControllerDelegate protocol. This means that we can optionally implement either of the methods for this protocol:
– popoverControllerShouldDismissPopover:
– popoverControllerDidDismissPopover:
I need to implement the popoverControllerDidDismissPopover: method in my ViewController so that I can know when the popover has been dismissed by touching outside of the popover, rather than hitting the anchor UIBarButtonItem again.
Inside this method we are simply going to set our _filterPopoverController to nil so that when the user does touch the anchor UIBarButtonItem again, the variable is nil and we show the popover to the user.
#pragma mark - UIPopoverControllerDelegate method(s)

- (void)popoverControllerDidDismissPopover:(UIPopoverController *)popoverController {
  _filterPopoverController = nil;
  _wordCategoryPopoverController = nil;
}
I hope this post helps you implement the Popover in your next iPad application. As I noted in the beginning, because our universal application has a separate storyboard for the iPhone edition, we simply show the same filter table as a modal view. This way, the functionality is the same across both platforms, and both platforms use the same ViewController code.
Please post any questions you may have in the comments below.