
The UIToolbar class provides a simple and easy way to create a toolbar for your users.
You will often find these toolbars located at the bottom of your view.
Cocoa touch provides an easy implementation for creating and adding items to the toolbar.
You can create the toolbar programmatically, or you can add the toolbar to your view using your storyboard file.
In this example I am going to add the toolbar using the interface builder.

Getting Started
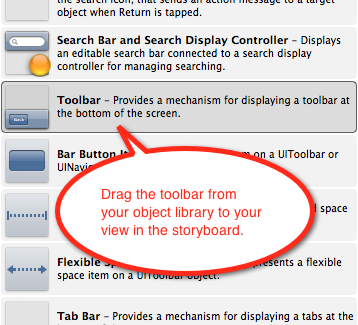
To start, open the storyboard file in Xcode, which will open the interface builder so you can add the toolbar visually to your view. Drag the toolbar from the object library to your view and place it where you want it to appear.
You can click on the default item that is added by default, which is simply titled “Item”, and remove it.
We will be adding each UIBarButtonItem programmatically in our view controller.
Before we create each button item, we will need to create a variable in our view controller that will reference the toolbar object in interface builder.
Open your view controller header (.h) file, and add a property for the IBOutlet:
@property (weak, nonatomic) IBOutlet UIToolbar *toolbar;Here, we have created a new class property which is an IBOutlet of type UIToolbar, which is declared with a variable name of toolbar.
This class variable will contain a reference to our UIToolbar object.
This allows us to access the toolbar object in our code, which we will need in order to add the items to the toolbar.
Then, open your view controller implementation (.m) file, and synthesize the property accessors for the toolbar variable:
@synthesize toolbar;Next, you will use the connections inspector to create a new outlet to connect the object in interface builder to a IBOutlet variable in your code.
To do this you will first select the toolbar object in the interface builder, go to the connection inspector and then click-drag from the circle next to New Referencing Outlet to the view controller, represented by the view icon within an orange circle, located below the view in the interface builder.
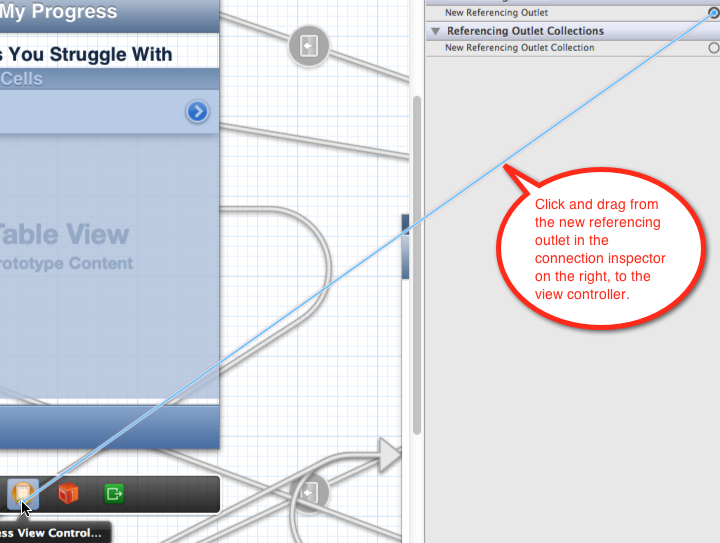
When you release your mouse, select the toolbar property that we defined previously.

Create each UIBarButtonItem
We now have a connection set up between our object in interface builder, and our property in the view controller code.
We can now use this toolbar variable to access the instance of the toolbar we have placed into our view.
Next, we need to create the UIBarButtonItems.
To do this, I am going to create an instance method named createToolbar:.
I am going to call this method after the view has been successfully loaded, using the viewDidLoad: delegate method.
- (void)viewDidLoad
{
  [super viewDidLoad];
  // Do any additional setup after loading the view.
  [self createToolbar];
}
In the createToolbar: method, we will create an instance of UIBarButtonItem for each button in the toolbar.
We first allocate the memory for the UIBarButtonItem by calling the alloc: class method.
Then, we call the initWithTitle:style:target:action: method to initialize the button with the desired title and style.
In this example, I am going to use the UIBarButtonItemStyleBordered option for the style. I will also set the target as the current class by specifying the target as self.
Lastly, I will set the action using the @selector() operator.
The @selector() operator is similar to a function pointer in C, or passing reference to a function variable in JavaScript.
This decouples the code that specifies the function to call from the code that calls/executes the function.
Here is the single line of code that will create a new button item:
UIBarButtonItem *changeCategory = [[UIBarButtonItem alloc] initWithTitle:@"Change Category" style:UIBarButtonItemStyleBordered target:self action:@selector(goToChangeCategory:)];We will also want to use a spacer between our buttons. You can use a fixed width spacer, where you define how large the gap is between your buttons, or you can use a flexible spacer.
UIBarButtonItem *spacer = [[UIBarButtonItem alloc] initWithBarButtonSystemItem:UIBarButtonSystemItemFlexibleSpace target:self action:nil];Once you have created all of the buttons for your toolbar, create an array of the buttons with a spacer between each one.
Lastly, you will call the setItems: method on your UIToolbar.
Here is my completed createToolbar: instance method.
- (void)createToolbar {
  UIBarButtonItem *changeCategory = [[UIBarButtonItem alloc] initWithTitle:@"Change Category" style:UIBarButtonItemStyleBordered target:self action:@selector(goToChangeCategory:)];
  UIBarButtonItem *difficultyExplanation = [[UIBarButtonItem alloc] initWithTitle:@"What is Difficulty?" style:UIBarButtonItemStyleBordered target:self action:@selector(goToDifficultyExplanation:)];
  UIBarButtonItem *spacer = [[UIBarButtonItem alloc] initWithBarButtonSystemItem:UIBarButtonSystemItemFlexibleSpace target:self action:nil];

  NSArray *buttonItems = [NSArray arrayWithObjects:spacer, changeCategory, spacer, difficultyExplanation, spacer, nil];
  [_toolbar setItems:buttonItems];
}
Finally, we need to create each action method that is going to perform the desired action when the button item is touched. In my case, I am simply going to perform a segue to another view.
- (IBAction)goToChangeCategory:(UIButton *)sender {
  [self performSegueWithIdentifier:segueToWordCategoryView sender:self];
}
-(IBAction)goToDifficultyExplanation:(UIButton *)sender {
  [self performSegueWithIdentifier:segueToExplanationView sender:self];
}
In this example, I have defined static NSString variables to hold the segue identifiers:
static NSString *segueToWordCategoryView = @"ToWordCategory";
static NSString *segueToExplanationView = @"ToExplanation";
These are defined at the top of my implementation file so I can reuse the segue identifiers. We now have a toolbar with two items, which will take our users to different views within our application.